Painting birds in water colour
Tissa Hewavitarane
 The simplest animal to draw and paint are birds. This is due to their
rounded and tapering shape and absence of complicated structure. To
paint birds it is not necessary to go too far. You can find a good model
at home, in any pet shop, photographs in books or magazines, or in the
zoo. The aid of a photograph is one of the most widely used, especially
when you must paint fidgety animals. The simplest animal to draw and paint are birds. This is due to their
rounded and tapering shape and absence of complicated structure. To
paint birds it is not necessary to go too far. You can find a good model
at home, in any pet shop, photographs in books or magazines, or in the
zoo. The aid of a photograph is one of the most widely used, especially
when you must paint fidgety animals.
Basic structure and the drawing
The first thing that the painter must resolve before painting any
animal is the study of its anatomy. Any watercolourist must always
practice drawing, whatever the subjects that is being developed, but for
the motifs that require an anatomical study, the drawing is more of a
necessity than a support, as it can be for a landscape.
Proportions, measurements, shadows and highlights must be studied
before painting. Painting birds will, doubtlessly, be one of the
subjects that most rapidly attracts the attention of the enthusiast. In
the first place, great attention must be paid to the initial sketch of
the anatomy of the bird. Once the initial sketch is done, finish off the
lines that define the anatomy of the bird.
Colouring the drawing
When the drawing is completely defined, you can start to add colour.
The best way to learn is with practice. The techniques that have been
used in drawing birds and animals are the same as those used for
landscapes and still life, on previous subjects, only the way the stroke
is applied changes. Note the cock birds I have done related to this
article.
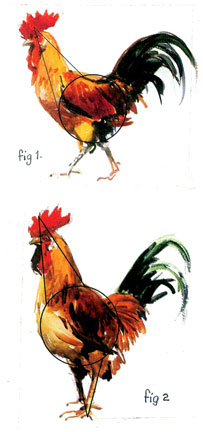 Fig 1: Fig 1:
As you can see, the pose of this cock is different from the other.
However, the method used does not change at all. In this illustration it
can be seen how the red brushstrokes of the wing are superimposed on the
initial orange wash.
Fig 2:
Observe the superimposed sketch how easy it is to structure the
anatomy of this bird. It is only a circle for the body and a triangle
for the neck and head. Once the drawing is complete, the painting
process is started with a very luminous, ochre and umber wash for the
lightest tones of the breast.
The first wash do not give texture to the feathers. These are painted
with very supple strokes. Pay attention to the whites that remained
reserved.
Many beginner artists think that birds are much too difficult to
sketch because they rarely stay still for long, so they never attempt
this fascinating subject.
I once thought the same way, but became hooked on identifying the
birds around me. Became increasingly interested in them and then began
to draw them by studying photographs of birds, drawings and specimens in
the museum. To draw and paint our feathered friends requires patience,
keen vision, attention to detail, a good memory and ability with pen or
pencil.
When I want to draw a bird I first take a good look at the overall
shape of it. I then do an outline drawing before adding beak, eye and
wing details. With a little practice you will soon become good enough to
draw some birds from memory even after only a fleeting glimpse. Watch
how a bird behave. See how a bird can stretch or contract its neck, and
the way it uses its legs.
Try to extend your skill by studying them for a while then jot down
what you see. This is excellent practice for drawing from life. You need
to travel a lot to observe their behaviour before sketching them. A
visit to your local park, pond, river or lake or a trip to the zoo can
provide a great stimulation to any painter.
Birds in variety
There are number of birds in variety. It’s nice for city dewellers to
visit the sea in order to see exotic birds. Mainly the sea galls. Many
more are seen in open areas. The flamingos at Bundala lagoon, the crows
in your own home garden. The magpie robin that sing every morning.
The mynah, parrot, king fisher, cuckoo and peacock are observed in
many places like paddy fields, lake sides and forests. The biggest bird
santuary in Sri Lanka, is found in Yala. Painting birds sometimes calls
upon all the technical skill of the artist, because of the complexity of
the process, although, often, the success of great work lies in
simplicity. As has been stated throughout all the topic, before starting
to paint it is necessary to do a drawing as perfect as possible.
If you look closely at the illustrations, you can see, each bird is
placed, starting from an almost oval shape. The principle colour used,
to paint some of the birds shown here are green. It is used in a
transparent tone which permits each one of the light or shadow zones to
be placed.
This is where the drawing becomes essential not having done it would
make it impossible to establish the white reserves. The dark shadow
tones are painted on the top of the most luminous colours. The brush
strokes on the head and wings are done on the dry background. All the
strokes on the back of each bird are done as can be seen, the lines are
curved and help to suggest its volume and depth.
Summary
The initial paint on the three birds on top is yellow. Before it
dries it is painted green.
The tails of the birds are done with one brush stroke. Afterwards the
necessary contrasts are added. The heads of the birds are done with a
very transparent layer, on top.
On the back multiple brush strokes of dark colours are used to
complete the texture of its characteristic plumage.
Most bird pictures, are much better done as paintings, but before you
start painting you need to learn how to draw your subjects accurately.
www.tissahewavitarane.com |